

Build your first customer journey in cXpify
A customer opens your first email. What should happen next?
Perhaps they need a demo link. Someone who hasn’t opened it may need a clearer reason to care or simply more time. Sending both people the same follow-up misses that difference.
That’s the thinking behind a customer journey. You decide who the conversation is for, what starts it, and how the next step should change as people respond. In cXpify, those steps take shape on a visual canvas, with channel nodes, decision nodes, wait nodes, and endpoints.
This guide follows a market outreach example in cXpify, from preparing a segment to reviewing an AI-generated journey. Along the way, we’ll look at the controls that help you keep the experience deliberate and manageable. In this guide
- Prepare the right audience
- Create and name your journey
- Give the AI Workflow Creator a useful brief
- Understand the journey nodes
- Review the generated paths
- Understand advanced routing
- Check your journey before sending
Start with one outcome
Before opening the builder, finish this sentence: “This journey should help this audience take this next step.”
For our example, the audience is prospective customers, and the next step is exploring a cXpify demo. An initial message introduces the product. A later branch sends interested recipients a demo link, while another path explains the value in more detail. The sequence eventually ends.
Keep that first outcome narrow. A journey that tries to introduce your brand, explain every feature, book a call, and win a purchase can quickly become difficult to follow. A clear purpose makes the writing easier and makes it easier to spot an unnecessary message.
1. Prepare the audience before the conversation
In cXpify, open CDP → Segment, then select Create Segment. The segment workflow has three stages: Select / Create Segment, Segment Query Builder, and Save.
The selection screen offers starting points such as Most Engaged, Phone Only, Multi-Channel Reachable, WhatsApp Only, Inactive Audience, Email Only, and New Audience. You’ll also see a Custom Segment option.
Read the description beneath each starting point. For example, the demonstrated Phone Only option describes contacts with a phone number but no email address. Multi-Channel Reachable describes contacts reachable on both email and phone. These are useful distinctions when choosing the channels for your journey.
Review the criteria and audience count
After selecting a starting point and clicking Next, review the Segment Query Builder. The screen includes a Segment AI Query Builder with a Generate Query control, plus a Query Builder section and Get Audience Count.
Use the count as a sense check. If you expected a small group and see almost your whole database, revisit the criteria before continuing. A large audience is only useful when it is the right audience.
Choose Execute & Next to move to Segment Details. Here, cXpify presents two segment types: Static, labelled “Fixed audience,” and Dynamic, labelled “Auto updates.” Choose the type that fits whether you want a fixed group or membership that updates.
Give the segment a recognisable name, add useful tags, and review the total audience count. Expand Preview Sample Audience Data to check a sample before selecting Save & Finish. In the walkthrough, the saved segment returns to the Segments list with a success confirmation.
Match the audience to the channel. The segment recording demonstrates a Phone Only audience. The journey recording includes email. For an email-based journey, prepare an audience with email addresses don’t reuse the phone-only example unchanged. A phone number alone also doesn’t establish WhatsApp or RCS eligibility. Check the requirements and permissions for each channel you intend to use.
2. Create a journey your team can recognise
From the Journeys screen under Engagement, select Create Journey. The form includes Journey Name, Description, and Journey Tags.
The example is named “Market Outreach.” For your own campaign, a more specific name such as “Demo interest September prospects” can make it easier to identify later. Use the description to record the audience, the purpose, and what should happen when the sequence ends. Tags help organize related journeys.
The form provides Save and Next controls. Save the basic details and continue to the Build Journey canvas. This is where the sequence becomes visible.
3. Turn your brief into a workflow with AI
Select AI Workflow Creator on the canvas. Enter your instructions in the Workflow Creator text box, then choose Generate Workflow.
The demonstration asks for outreach through WhatsApp, RCS, and email, with a six-hour wait, follow-up based on email opening, and repeated attempts. cXpify generates a connected workflow that can then be inspected on the canvas.
The more clearly you describe the sequence, the easier the result will be to review. Include the first message, the response you care about, what each branch should do, and when the conversation should stop.
Example brief to adapt
Create a market-outreach journey for an audience eligible for WhatsApp, RCS, and email. Include introductory messages on those channels. After the initial email, allow six hours for a response. If the email-open condition is met, send an email with a demo link and end that path. Otherwise, send an email explaining the product’s value, wait before the next check, and limit the sequence to three checks. End the no-engagement path after the final follow-up.
This is a starting brief, not a guarantee that every setting will be completed exactly as intended. Check the generated timing, conditions, channel configuration, and endpoints before using the journey.
Be especially precise about repetition. “Repeat three times in a week” leaves room for interpretation: three messages, three checks, or three additional attempts? Write down the intended total and compare it with the actual nodes. If you need the journey spread over a week, confirm that the configured waits produce that schedule.
4. Get familiar with the four node groups
The cXpify node palette groups the available building blocks by their role in the journey. Understanding those groups makes a generated workflow much easier to read.
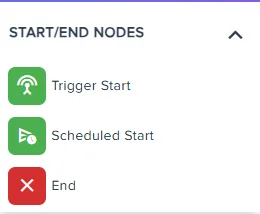
Start/End Nodes: where the journey begins and finishes
The palette lists Trigger Start, Scheduled Start, and End. When planning your journey, decide whether its entry should relate to a trigger or a schedule, then review the corresponding start node’s settings. Use End nodes to give the routes clear finishing points.
A person who receives the demo-link message and a person who reaches the final unanswered follow-up need not finish through the same endpoint. Separate endings can make the intended experience easier for your team to understand.
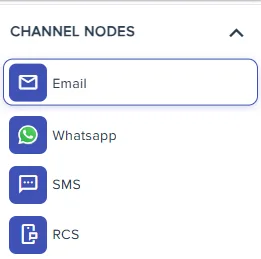
Channel Nodes: the messages in your sequence
The available channel nodes shown are Email, WhatsApp, SMS, and RCS. The recorded workflow uses WhatsApp, RCS, and Email; SMS appears in the palette.
Give each message a purpose. An introduction should explain why you’re reaching out. A demo invitation should make the next step easy. A follow-up should add something useful rather than repeating the introduction word for word.
Review the configuration of every channel node. A box labelled “Marketing Message” describes its role in the workflow; the label alone does not prove that its content and sending details are ready.
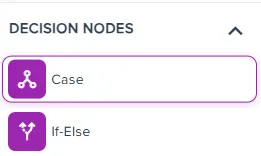
Decision Nodes: where the next step changes
The palette includes Case and If-Else. In the generated example, “Check Open” nodes divide the journey into an email-open route and an else route.
Read each branch as a customer story. If the condition is met, where does the person go? If it isn’t, what will they receive? Give the alternate path just as much attention as the path you hope most people will take.
Keep the condition tied to the intended message and action. “Opened the introductory email” is a different requirement from “has an email-open value.” The generated canvas shows an email_open notNull branch label; inspect its configuration before assuming it checks a particular message within a particular time window.
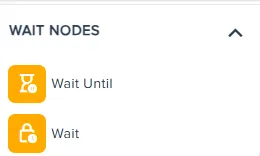
Wait Nodes: room for the customer to respond
The palette lists Wait Until and Wait. In the recorded workflow, hourglass nodes labelled “Wait for Open” appear before the decision checks, while separate Wait nodes are labelled “Wait 6h.”
Review both kinds of pause. For an event-related wait, check what allows the person to continue and what happens if the expected response never arrives. For a duration-based step, check the actual configured duration. A descriptive node name is helpful, but the underlying settings determine the intended behaviour.
Timing is part of the message. A useful reminder can feel persistent when it comes too soon. Choose a cadence that fits the decision you’re asking someone to make.
5. Walk through the generated journey from start to finish
Once generation finishes, follow the connectors across the canvas. The outreach example begins with a start node and introductory WhatsApp, RCS, and email nodes. It then moves into a wait and an email-open check.
The response paths are easy to recognise: an open-related branch leads towards an email containing a demo link, while an else branch leads to an email explaining why the recipient might explore cXpify. Further waits and checks continue the sequence. The canvas shows three “Check Open” steps and a final “End: No Engagement” node.
Now inspect the journey in smaller pieces. Does the first follow-up make sense immediately after the first message? Does each subsequent check look at the response you intended? Does a recipient who takes one branch avoid messages intended for another?
Also review the opening channel sequence. The generated example places WhatsApp, RCS, and Email in succession; that layout alone does not establish a fallback strategy. If your intention is to try a second channel only when the first is unavailable, verify and configure that logic explicitly.
Look for a sensible endpoint on every route. A lack of response should eventually bring the outreach to a close. A successful interaction should lead to the next useful step without unnecessary reminders.
6. Understand Insert, Bypass, Jump, and Exit
The supplied WhatsApp node screenshot shows an Advanced tab with four controls. These affect movement through the journey, so use them with a specific routing requirement in mind.
| Control | What it does | What to review |
|---|---|---|
| Insert | Allows recipients to enter at this node and continue through the remaining steps. | Will someone entering here have enough context for the messages that follow? |
| Bypass | Skips this node’s execution and moves recipients to the next step. | Does skipping this action leave the rest of the sequence meaningful? |
| Jump | Routes recipients to a specified node after this step instead of the next connected node. | Is the destination correct, and could the route cause unintended repetition? |
| Exit | Removes recipients from the journey at this point. | Is this the point where their participation should finish? |
Bypass and Exit have different consequences: Bypass continues the journey; Exit stops the recipient’s participation. Jump changes the destination after the current step. Insert provides an entry point at the node.
The screenshot shows these options on a WhatsApp node. Review the controls available on the node you’re configuring, including any additional settings that appear when an option is enabled.
7. Review the details before any live send
Generating a workflow is a useful first milestone. Making it ready for customers takes another pass.
The recorded canvas includes warning indicators on some generated nodes. Open those nodes and resolve the relevant configuration issues. The separate WhatsApp screenshot displays “All validations passed,” but that status applies to the displayed panel; it does not establish that the complete recorded journey is ready.
- Audience: Check the segment criteria, sample records, channel eligibility, and permissions.
- Entry: Confirm the intended start node, entry configuration, and audience selection.
- Messages: Review sending details, content, personalisation, and destination links in every channel step.
- Decisions: Check each condition’s data, relevant message or event, and alternate route.
- Timing: Inspect the configured waits and calculate the complete sequence’s intended duration.
- Routing: Follow every connector, including any advanced routing options, to a deliberate endpoint.
- Validation: Resolve outstanding warnings and review the completed journey with your team.
The builder displays Save and Finish controls. Save your reviewed work and confirm your account’s activation procedure before sending to customers. The walkthrough covers workflow creation and inspection; it does not demonstrate activation or a live campaign send.
Make the next step feel natural
cXpify brings audience preparation and visual journey design into the same product. The demonstrated AI Workflow Creator gives you a connected starting point, while the canvas lets you inspect how messages, waits, and branches fit together.
The most useful journey is one you can explain without pointing at the screen: who it helps, what they receive first, how their response changes what happens next, and when the conversation ends.
Start with one audience and one purpose. Use AI to draft the sequence. Then take the time to make each step feel like a thoughtful continuation of the conversation.